Almost all of these cars still in existence
today have bad or missing felt T-Top seals and
many owners really don’t know what to do about
getting them replaced. This job is fairly
simple, will require a small investment in new
parts and materials and about 3 to 4 hours of
your time. My T-Top seals were showing their age
and since most of all the other work on my car
was finished, I decided to do a little detective
work and see if I could root out some
replacement seals.
Here is some history and what I found:
In 1983 the original seals (the cloth/felt part)
in my 1978 Magnum were bad and I took the car
back to the dealer to get them replaced. The
dealer referred me to Wisco (an American Sunroof
Company). I made an appointment and took the car
to their place in Ferndale, Michigan. They
replaced both seals for $88.74 and it took them
about 2 hours. Sure wish I could get that done
today!!
I tried to call Wisco and immediately hit a dead
end, I think they are out of business.
Did a little searching and found my old receipt
for the seal replacement done by Wisco in 1983.
The part numbers for the seals were listed on
the invoice, these seals are referred to as 7.9
seals and the ASC part number is
G-24X1-0051-BEXX. I did a search on Yahoo and
found a place in Illinois that had that number
listed. Called them and as luck would have it I
hit another dead end, the seals were no longer
available.
More searching found the phone number for
American Sunroof (ASC). I called them and they
referred me to another company called Kelly's. I
called Kelly’s and talked to Jake, I told him
what I wanted and he referred me back to ASC. I
then called Pete at ASC and talked with him, he
was involved with the Mopar T-Tops back in the
70s. Here is the deal; The 7.9 T-Top Mopar seals
are no longer available and nobody is making
reproductions. However, 6.8 T-Top seals that
were used on the Ford Mustangs from the late 70s
are available from Kelly's. After talking with
both Pete from ASC and Jake from Kelly's I felt
comfortable that the Mustang felt seals would
work. According to both guys the 6.8 seal is a
slightly smaller seal and they felt the 6.8
seals "should work just fine", the seals just
won't have the same “compression” as the 7.9
seals. I placed an order for a set, they were
$38.50 per side plus shipping.
A few days later the seals arrived. The new 6.8
seals look very close to the originals, are
plenty long enough and as I suspected the only
difference I could see between the new seals and
the originals is that the tubing inside the felt
material is a little smaller, I felt even better
that they would work fine.
It's off to the auto parts store to get some
adhesive remover and 3M weatherstrip adhesive
(super stuff).
Seals and installation are fairly simple.
Removal of the old adhesive is a bit tedious. Be
CAREFUL when removing your old seals so you
don't bend any of the aluminum trim when pulling
off the old parts. Once you get into this you
can see there was not a whole lot of thought put
into this seal system. They are just basically
glued into place and the ends are tucked into
holes in the trim pieces at each end.
The only other tricky part will be finishing the
ends. Some careful trimming and tucking into
existing trim will do the trick.
These seals have metal tape sewn inside to give
them some rigidity. When going around a curve
you can put cuts in the bottom to form the seal
to the curve. This is the way my replacements
were installed by Wisco.
Finally, you will want a vacuum with a wand to
clean out pieces of residue that fall in the
channel after the job is done.
Installation:
1. Remove the glass panel and lay down some
plastic sheeting to cover the entire
interior, you don’t want solvents or
adhesives dripping down on your seats,
carpeting, or dash. I found it best to work
on one side at a time.
2. Start by removing the old felt seals,
these seals were only held in by glue from
the factory and it looked to me like they
used an adhesive similar to contact cement.
When pulling out the originals be very
careful not to bend any of the trim pieces!
Just start at one end and pull the seal out.
Note: Before you remove your old seals look
at the way the ends are terminated into the
trim pieces.
3. Now it’s time to remove the old adhesive.
I sniffed the adhesive release solvent they
had at the auto parts store and it smelled
just like lacquer thinner so I just used the
stuff I had in my garage. This part is what
will take the most time, don’t rush it!
4. Liberally apply the remover to the old
adhesive stuck on the aluminum trim pieces
using an acid brush and let it soak for a
while. The solvent will soften up the old
adhesive so it can be easily removed. I
applied it every 2 or 3 minutes for about 20
minutes. It softens up the old stuff pretty
good. If you don't work at this the old glue
will harden up again after the solvent
evaporates. Start gently scraping,
preferably with a plastic scraper. Just keep
working at it until you get it off. Once you
have removed most of the old adhesive use a
dry rag to rub off remaining residue. Be
careful here not to get any solvent/remover
on painted or interior surfaces. It
shouldn’t hurt paint that has been there for
a while but the remover will soften any new
paint. Make sure you use a plastic knife or
scraper, a metal one can damage the trim
pieces or painted surfaces.
5. Once everything is dry you should test
fit the new felt seal. Mine were about 10
inches longer than what I needed. Leave
about 3 to 4 inches of excess felt seal
extending out from the T-Top edges. This
will have to be trimmed later and tucked
into a small hole in the trim to finish the
job.
6. The 3M weather-strip adhesive cement is
like contact cement. You apply it to both
surfaces, wait for it to get tacky and stick
everything in place. I worked this in
sections so I wouldn't get glue on anything
else like the seats!! Just start at one end
and work your way around. I used the top
surface of the roof trim as an alignment
guide. The new seals are stiff and bendable
with the aluminum tape used for a
foundation. Use adhesive on both the trim
piece surface and the seal surface. Then
just work slowly and work the seal around
the curves in the trim pieces. Take your
time!! After the felt seal is glued in place
insert your glass panel to hold everything
in place while the adhesive cures. See
picture below.
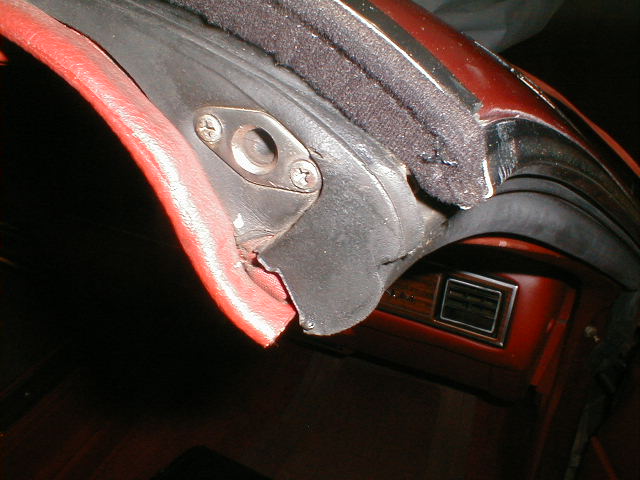
7. All that is left is to trim the ends and
tuck the material into the trim openings. If
possible, let the adhesive cure for a while.
I left the T-Top panel in place for a couple
of hours before I started this step. The
ends are just tucked into openings in the
trim. On the front it is tucked into the
trim piece end opening. In the back there is
a hole in the trim piece that you have to
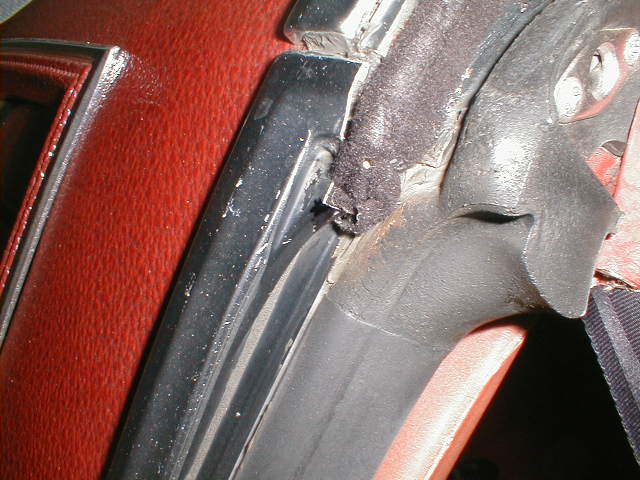
tuck the seal into. I started by cutting off
the excess leaving about 2 inches. I then
removed the thread/stitching from the two
seams and cut just the tube (not the
material or aluminum tape) at the edge of
the t-top panel in the roof so it doesn't
hang down. I put the felt material back
around the metal tape and folded it in a
fashion so it would fit into the trim
openings the old seals were in. You will
need to cut the material and tape so it
fits, you won't be able to tuck a whole lot
of the material into the opening. This last
step is trial and error as you will have to
trim and try fitting the ends of the felt
seal in the trim piece openings until it
fits properly. Once you finish one side the
other will be much easier. See pictures
below to see how I did it.
Contact
information for the seals is:
Jake Kelley
Kelley's Custom Auto Restyling
68364 Commercial Road
Cathedral City, CA 92234
(888)298-8140
(760)770-3385
Part description;
6.8 Sunroof seals for Chrysler Cordoba "T" Top.
Total for parts and shipping to Michigan was
$85.18
Summary:
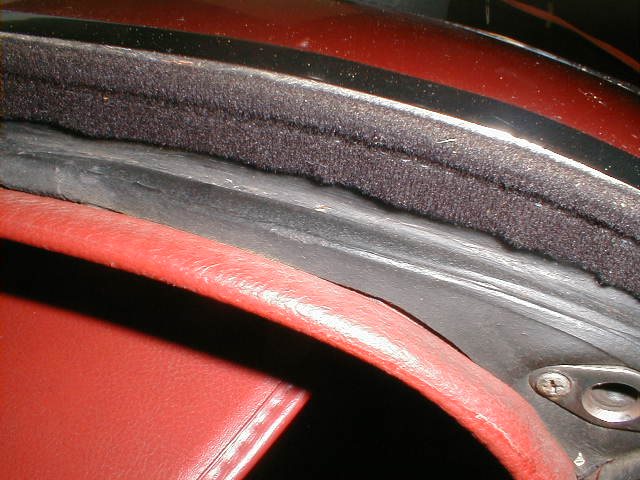
The seals for the Cordoba/Magnum consist of a
flexible tube similar to surgical tubing and
aluminum tape about 3/4" wide wrapped with a
felt material. One of the big differences
between these seals and the originals is that
the newer ones are stitched with 2 seams. This
stitching forces the rubber tube to the top of
the seal. My original seals allowed the tube to
float around. Another thing I noticed about the
new seals is that the wall thickness of the tube
used has much thicker walls. So, even though it
is slightly smaller in diameter than the
originals it is more resistant to being
squashed. The glass panels fit nice and snug!
Since these seals are glued in place and no trim
needs to be removed, I don't think there should
be any rattling issues. Took my car down the
road after the new seals were installed and was
pleased to find it much quieter than before. No
wind leaks. Even pushed her to 80 mph for the
wind noise skeptics, still no wind leaks,
whistles and no rattles.
The hardest part of this job is removing the old
adhesive. I probably have about 15 minutes in
removing the old seals, 2 to 3 hours removing
old adhesive and probably about 45 minutes
installing the new seals.
Overall, I'm pleased with the way they function
and look. My old seals were tired and the
passenger side was starting to tear in places
and likely would not have survived the summer.
Just remember the 3 rules..... Patience,
Patience, and Patience. It's worth the effort!!