
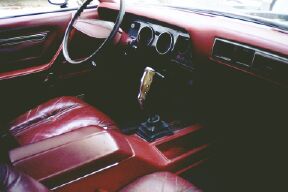
Pistol-Grip Shifter
Conversion of my small block automatic 1979 Dodge Magnum to a big block (383) 4-speed transmission
ATLANTIC DODGEBOY
Nova Scotia, Canada
Car converted: 1979 Dodge Magnum XE Originally equipped with 360/Auto, open rear end, single exhaust and Lean Burn Ignition.
The car was to be completely rebuilt from the ground up so the entire front sheet metal was removed as well as every item on the firewall-the complete interior was also removed including the dash. The more room and fewer things to catch fire always help.
NOTE: The car was raised on car stands at all four corners with both the rear cross-member and torsion bar cross-member removed. I used a ’68 B-body A-833 transmission (long tail shaft) with the shifter mounted to the front of the tail shaft. This shifter mount is a must because the rear shifter mount on the tail shaft is directly in line with the rear transmission cross-member on the floor.
Step#1 Remove the engine and transmission and reinstall a bare Small Block with the four-speed transmission. This assembly will NOT bolt up into place because the shifter cover will hit the floor hump. Make marks on the floor to cut out part of the floor and hump. Don’t cut too much, this is all trial and error. Just keep trimming the sheet metal until the transmission will go high enough to install the rear transmission cross-member and bolt down the engine.
Step#2 This step will only apply if you are also converting to a Big Block as I did. Measure the height of the top of the air cleaner assembly to the fender tops or fender support sheet metal and measure the amount of engine offset to the front frame rails. Keep in mind the Big Block is wider than the Small Block and that the clearances for the steering box is critical. There were no conversion engine mount kits available when I did this swap so I used factory Big Block engine mounts and I cut off the engine mount ears from the K-frame. These mounts were modified and reinstalled later. Remove the Small Block and transmission from the car and install a bare Big Block (with the oil pan installed) and transmission in the car. A floor jack will have to hold up the engine because the engine offset and height will have to be reestablished in order to modify the frame engine mount ears before they can be tacked welded back in place (this step is very critical) I made a jig that went from the oil pan and clamped to the tail shaft with a hose clamp, straight back to the rear end to maintain its parallelism. I measured from the rocker panels to this jig. Having the headers before hand is a must because this is another variable to contend with as well as the oil pump clearance to the K-frame. DO NOT finish weld anything until everything you can think of, and then some has been checked for fit. So reinstalled as many pieces as possible on the engine and transmission.
Step#3 I used a bare Big Block engine because of the amount of fabrication that was done to create the clutch linkage (you can never have too much room). First, fabricate the frame bracket for the ball pivot in the torque shaft (this is welded to the frame after). Now use a clutch torque shaft from any Mopar (they all have the same internal diameter) and install the ball pivot to the frame bracket and the other ball pivot to the threaded hole in the bell-housing. Install the torque shaft to the bell-housing and depending on the length of the shaft it will have to be cut shorter or lengthened but only cut the shaft in the middle because the end diameters are machined for the ball stud bushings and the outer end has two holes for the bushing lock clip.
Step#4 The pedal assembly I used was from a ’76 Road Runner. You will have to bend the outer end of the clutch pedal bracket to fit to the firewall. Use the Magnums bracket for the brake pedal so you won’t have any problems with the brake pedal linkage. You will have to make shims (sleeves) to go on the right side of both the brake pedal pivot bolt and the lower brake linkage pivot bolt because they are narrower. Funny that the Magnum has dimples on the firewall for the through holes for the clutch bracket.
(Makes you wonder if the Magnum may have had plans to be a standard.)
Now cut off the clutch pedal stop bracket and weld it on the pedal to allow the clutch pedal to come upward (about 1/2 -3/4 inch higher than the brake pedal)
Step#5 A clutch fork will have to be modified because it will hit the floor unmodified. I angled the outer end forward and downward to achieve the clearance to the floor and remember that the engine torque’s towards the right, which reduces the distance between the floor and the clutch fork.
Step#6 Cut a hole in the firewall for the clutch rod, this hole is oval in shape and you must use the proper rubber boot or it will not be watertight. This is the point that the proper ratio between clutch pedal travel and clutch fork travel is critical. You can’t change the pivot on the clutch pedal so the pivot points on the torque shaft and clutch fork will have to be created. Use another car and measure the amount the clutch fork moves. Now measure the amount that the clutch rod moves, but don’t push the pedal to the floor (leave around 1 inch or more) because there needs to be clearance for the carpet and some error in the rod pivots mounting points.
Step#7 The levers will have to be cut off the torque shaft and welded on for proper alignment with the rods and will have to be shortened or lengthened for the proper amount of clutch fork movement. This step takes a lot of patience and many measurements and the help of an extra set of eyes is needed.
Step#8 A shifter bracket will have to be fabricated to position the shifter under the console properly as well as shifter rods will also have to be fabricated. The shifter is positioned over the floor and above the rear transmission cross-member so the shifter bracket and rods are long (real long). I used my 1970 Charger 500 as a guide for critical measurements but the two cars have very few similarities when comparing body dimensions.
Step#9 After enough sheet metal is trimmed from the floor and hump the shifter hump will have to be fabricated. A shifter boot will have to be installed on top of the hump that will fit the hole where the auto shifter use to be.
Extra Notes: The carpet will have to be cut to accommodate the new floor hump, I glued mine to the hump so it wouldn’t move. I also used the gauge cluster assembly from a ’76 Road Runner and replaced the original tachometer (broken) with an after market one which has a shift light in the face.
An 8 3/4 rear was also installed-to handle the extra torque. This required fabricating sway bar mounts on the housing and upgrading the driveshaft to 2 5/8 U joints plus shortening it.
This modification is not for the faint at heart. It does take a lot of time and requires much cutting and welding (both Arc and Mig welders are needed).
Good luck to all who are brave enough to attempt this modification.